How to Disable Cortana in Windows 10
Most people discover Cortana to be genuinely helpful for browsing the internet, showing notifications and setting calendar reminders but security-conscious users might be wary of what the Artificial Intelligence assistant is learning about you, your schedule, location and sharing those tidbits with Microsoft.
Prior to Windows 10’s recent Anniversary Update, you could disable Cortana by toggling a single switch, but since then, Microsoft has made it almost impossible to do.

Here is how to turn off Cortana in Windows 10
The following steps are for advanced users: Please do a System Restore before you proceed as a precaution. The system restore will save your current PC setting and Data.
- Open registry editor by typing “regedit” in the search box located on the task-bar. If asked, allow the program to make changes to your computer, select “YES” to proceed.
- Go to the following Directory:
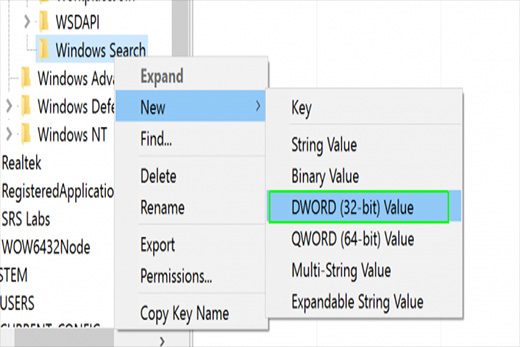
HKEY_LOCAL_MACHINESOFTWAREPoliciesMicrosoftWindowsWindows Search but wait! Windows Search might not be there. It wasn’t for us, so we had to create it. Right-click the Windows folder and choose New>Key. Call it “Windows Search.” - Right click “Windows Search” and choose New > DWORD (32-bit Value).
4. Rename the DWORD (32-bit) by changing it to “Allow Cortana.” Double Click the file after you rename it and make sure the value data is set to “0”.
5. Restart your PC to apply all changes before you do anything else . Cortana will be replaced with a regular search bar.
We hope this page was helpful to you. Let us know by leaving a comment below!